Oh the joy to be free of the cloud. (Someone elses computers!)
Overview
Here we document how to free your Silvercrest Gateway from the cloud for an offline integration into Home Assistant.
Steps are:
- Get the root password.
- Setup device for Home Assistant control
- Using Home Assistant’s ZHA to integrate the device.
Getting root password
Revealing the root password
Overview
The root password is set to the last 8 characters of AUSKEY which is some kind of identifier for the cloud services. The AUSKEY is stored, encrypted, in the SPI flash. (in the “tuya-label” partition.) The decryption key is also stored here so it is possible to recover the AUSKEY and thus also the root password for the device.
Get the root password
Getting the root password comprises three steps.
- Accessing the bootloader
- Using it to read the raw encoded values from the flash.
- Decoding the values
Pin 1 = Vcc (3.3V)
Pin 2 = Ground
Pin 3 = U2 Serial TX
Pin 4 = U2 Serial RX
Pin 5 = ZigBee module ARM Debug SWDIO
Pin 6 = ZigBee module ARM Debug SWCLK
Read the raw encoded values from flash.
To get the required values, you need to have attached a TTY3v3 serial port to the J1 connector on the board. The serial port parameters are 38400 baud, 8, N, 1 and no flow control. (If you find you can’t type, check flow control is turned off.)
Accessing the bootloader
- Power cycle the device whilst at the same time pressing the ESC key on the serial console. You should interrupt the boot process and end up at the RealTek bootloader prompt.
- Press ENTER to get a fresh prompt.
It should look something like this:
---RealTek(RTL8196E)at 2020.04.28-13:58+0800 v3.4T-pre2 [16bit](400MHz)
P0phymode=01, embedded phy
check_image_header  return_addr:05010000 bank_offset:00000000
no sys signature at 00010000!

---Escape booting by user
P0phymode=01, embedded phy

---Ethernet init Okay!
<Real
<RealTek>
Reading the key-encryption-key (KEK)
The AUSKEY is itself encrypted by another key that we’ll call the KEK. To read the KEK, type the following commands into the bootloader. The first command reads the value from flash into RAM. The next one displays the contents.
    FLR 80000000 401802 16
    DW 80000000 4
Make a note of the single line of output. This is your KEK.
Read the encrypted AUSKEY
Use the following commands
   FLR 80000000 402002 32
   DW 80000000 8
Make a note of the two lines of output. They are your encrypted AUSKEY.
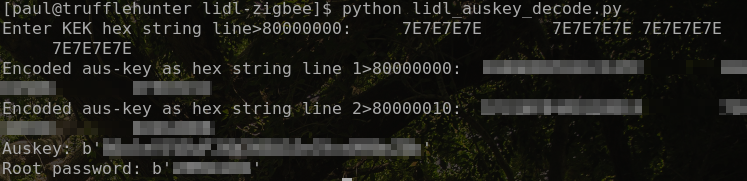
Decode the values
The script linked below can be used to decode the AUSKEY and root password.
Python script 1 kb
Start the python script and, when prompted, paste the lines obtained above to reveal your auskey and root password.
Example decode run :
Setting up device for Home Assistant control
Before starting, ensure your device is on your local network. If you’re unsure of its IP address, issue an ifconfig command on the serial console.
To set up this device we need to:
- Install a serial port to TCP/IP gateway program.
- Disable the Tuya Applications
- Set the TCP/IP gateway to boot on startup
1) Copy the MIPS(LX) compiled serial gateway to the device. Download here:
Serial gateway compiled for MIPS(LX) 53 kb (Source code)
From your host PC:
cat serialgateway.bin | ssh -p2333 root@192.168.1.254 "cat >/tuya/serialgateway"
2) Modify the boot script to disable the Tuya Applications and instead start the serial gatway.
On the device, execute the following:
if [ ! -f /tuya/tuya_start.original.sh ]; then cp /tuya/tuya_start.sh /tuya/tuya_start.original.sh; fi

cat >/tuya/tuya_start.sh <<EOF
#!/bin/sh
/tuya/serialgateway &
EOF
chmod 755 /tuya/serialgateway
This will backup the original tuya_start.sh script and replace it with a simpler one that simply starts serialgateway.
3) (Optional) Disable the Tuya customised SSH server and revert to the “standard” dropbear SSH server on port 22.
NOTE: After this step, the SSH server will be available only on port 22 and not 2333.
On the device, execute the following:
if [ ! -f /tuya/ssh_monitor.original.sh ]; then cp /tuya/ssh_monitor.sh /tuya/ssh_monitor.original.sh; fi
echo "#!/bin/sh" >/tuya/ssh_monitor.sh
If you’re happy that everything worked, reboot and your device is now controllable by Home Assistant on port 8888.
Using Home Assistant’s ZHA to integrate the device.
1) Create a new integreation of “Zigbee Home Automation”

2) Select enter manually for the port

3) Pick the EZSP radio type

4) Enter the ip address of your device in this format socket://ip.address:8888

Enjoy!