How To: Configure UBNT Wireless To Use RADIUS Authentication With Windows NPS (Walkthrough)
724k
I’ve seen quite a few people asking for a basic overview on how to configure Windows NPS (Network Policy Server, Microsoft’s implementation of the RADIUS authentication protocol) to work with UBNT equipment. This guide focuses on Unifi, but should be easily translatable to Edge/etc if you know your way around that system. I’ll also drill down into configuring MAC Based Authentication (MBA) which is a popular way to authenticate clients that otherwise don’t allow for WPA2-Enterprise authentication to wireless networks (which is most IoT devices). MBA allows you to authenticate clients based on their MAC address, which allows them to “automatically” be granted access by simply passing along their MAC address as the username/password combination. You create accounts in Active Directory with the MAC address as the username/password, and then you can group those accounts into AD Groups, AD Organizaional Units (OU’s) so that you can apply various AD policies to them, as well as create and apply Connection Policies (CP’s) and Network Policies (NP’s) to those groups. Nothing is different about this process except for the creation of accounts using MAC addresses, they are otherwise equivalent to any other AD account. From the point of view of the NPS server, it’s like logging in with a username and password.
NOTE: To prevent users from “spoofing” MAC accounts by logging in to a Windows machine with the MAC address, create GP’s that disallow those accounts from logging on locally (there’s a security setting to Deny Logon Locally that accomplishes this, as well as logging on as a service, etc…this way, MAC accounts can only be used as “passthrough” accounts with minimal privileges on the network).
A quick note on the differences between Connection Policies and Network Policies: CP’s define what kind of connection is allowed, and NP’s define the actual authentication and authorization policies. Think of CP’s as “allow connections from wifi” or “allow connections from wired”–technically you can define everything in NP’s only, but it’s a good idea to segment the two for finer granularity. Also, policies in NPS are processed in order, so start specific, widen your scope, and keep your deny policies last–this way nothing slips through, and if it does it’s handled by a deny policy. Processing will stop once a connection is either explicitly allowed, or explicitly denied, so you can’t chain them together. If you need to do that, put all the constraints in a single policy. You’ll also want to enable accounting to troubleshoot any issues that connections have while authenticating. Logging to a Sql Server is preferred, but a text file option is also available, and there are plenty of “log readers” out there. This is beyond the scope of this article though, but I’d be happy to author another article on how to configure those, and how to decipher the contents of the logs.
Enough housekeeping, how do I set this up with UBNT and NPS?
This article will only cover Wi-Fi SSID configuration via the Controller software for Unifi products, via the GUI. You should only need to do this once or twice, and this is applied at the “root” level meaning you don’t have to configure switches unless you have VLANs–I’m keeping it simple and doing the trunk (untagged network).
To create a RADIUS profile in the Controller UI, navigate to Settings -> Profiles -> RADIUS tab -> click “create new RADIUS profile”. Give it a name like “Active Directory NPS” or something descriptive, and configure it as shown in the screenshot below.
Make sure you make note of the Shared Secret you specify here as you’ll need it for the NPS backend configuration. This is the encryption key used for the handshake between Controller and NPS, and should be of high complexity. The standard port for RADIUS is 1812, and this is what NPS uses out of the box.
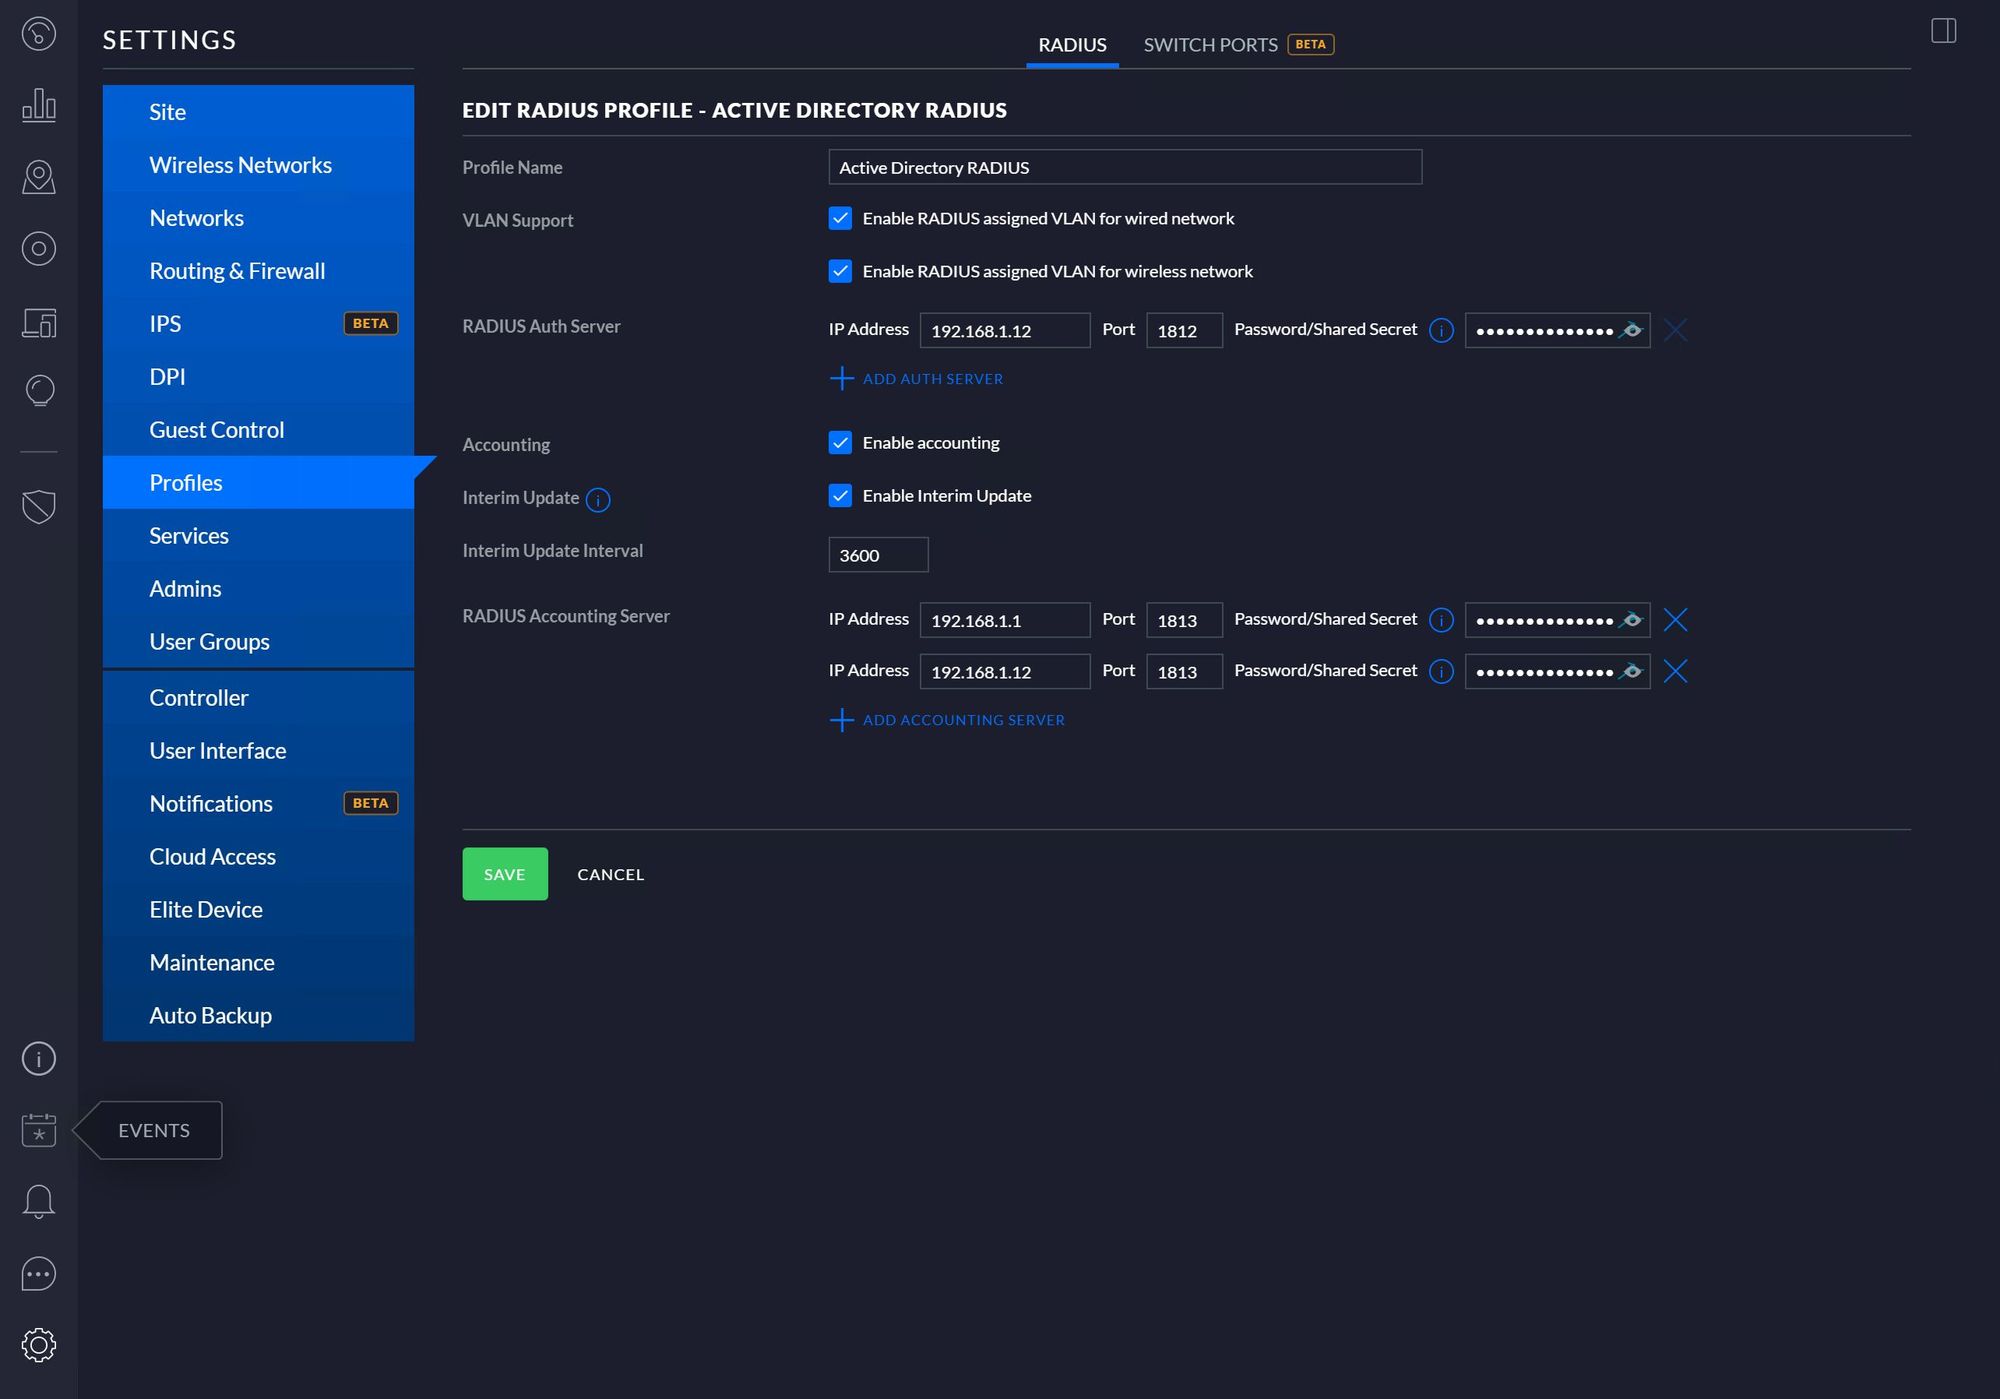
Notably, make sure the RADIUS assigned VLAN options are checked so that you can specify VLANs based on policy in the NPS server. If you want accounting, enable that, and you can specify more than one destination for accounting (in my case, I’m sending accounting data to both the local Controller instance as well as my NPS server–once sent to NPS, it processes it and writes it to whatever logging persistence you have configured. Note that NPS WILL ALSO write accounting data on its own, so make sure you’re prepared to parse out that data as well, NPS will ensure it’s formatted the same way though).
Once your profile is created, you’ll need to configure your Wireless Network to use it. The great thing about the Controller software is that you can use RADIUS authentication for virtually all types of networks:
- Guest accounts: You can configure your hotspot to use RADIUS authentication, which is great because you can restrict guest accounts within AD
- Open/WPA2-Personal via MAC Based Authentication for devices that don’t support WPA-Enterprise
- Standard WPA-Enterprise specified in the SSID configuration page
- VPN networks
If anyone needs more details about any of the above, I’d be happy to post instructions in the comments. I use NPS to authenticate every type of network connection in my Unifi installations.
This part should be self-explanatory (and I’ll touch more on MBA later on): You simply create a wireless network and point it to your RADIUS profile via the dropdown selection. Same thing with the Guest Portal: Enable RADIUS authentication, and point it towards the RADIUS profile you created above.
NOTE: If you’re going to use RADIUS authentication for your Guest Portal, make sure you have the RADIUS server’s network listed in the Pre-Auth Access list, otherwise your portal can’t contact the NPS server. Also make sure you’re using MS-CHAPv2 as this is what NPS uses for encryption.
This article assumes you already have NPS installed, if not, consult MSFT Docs for info on how to install it.
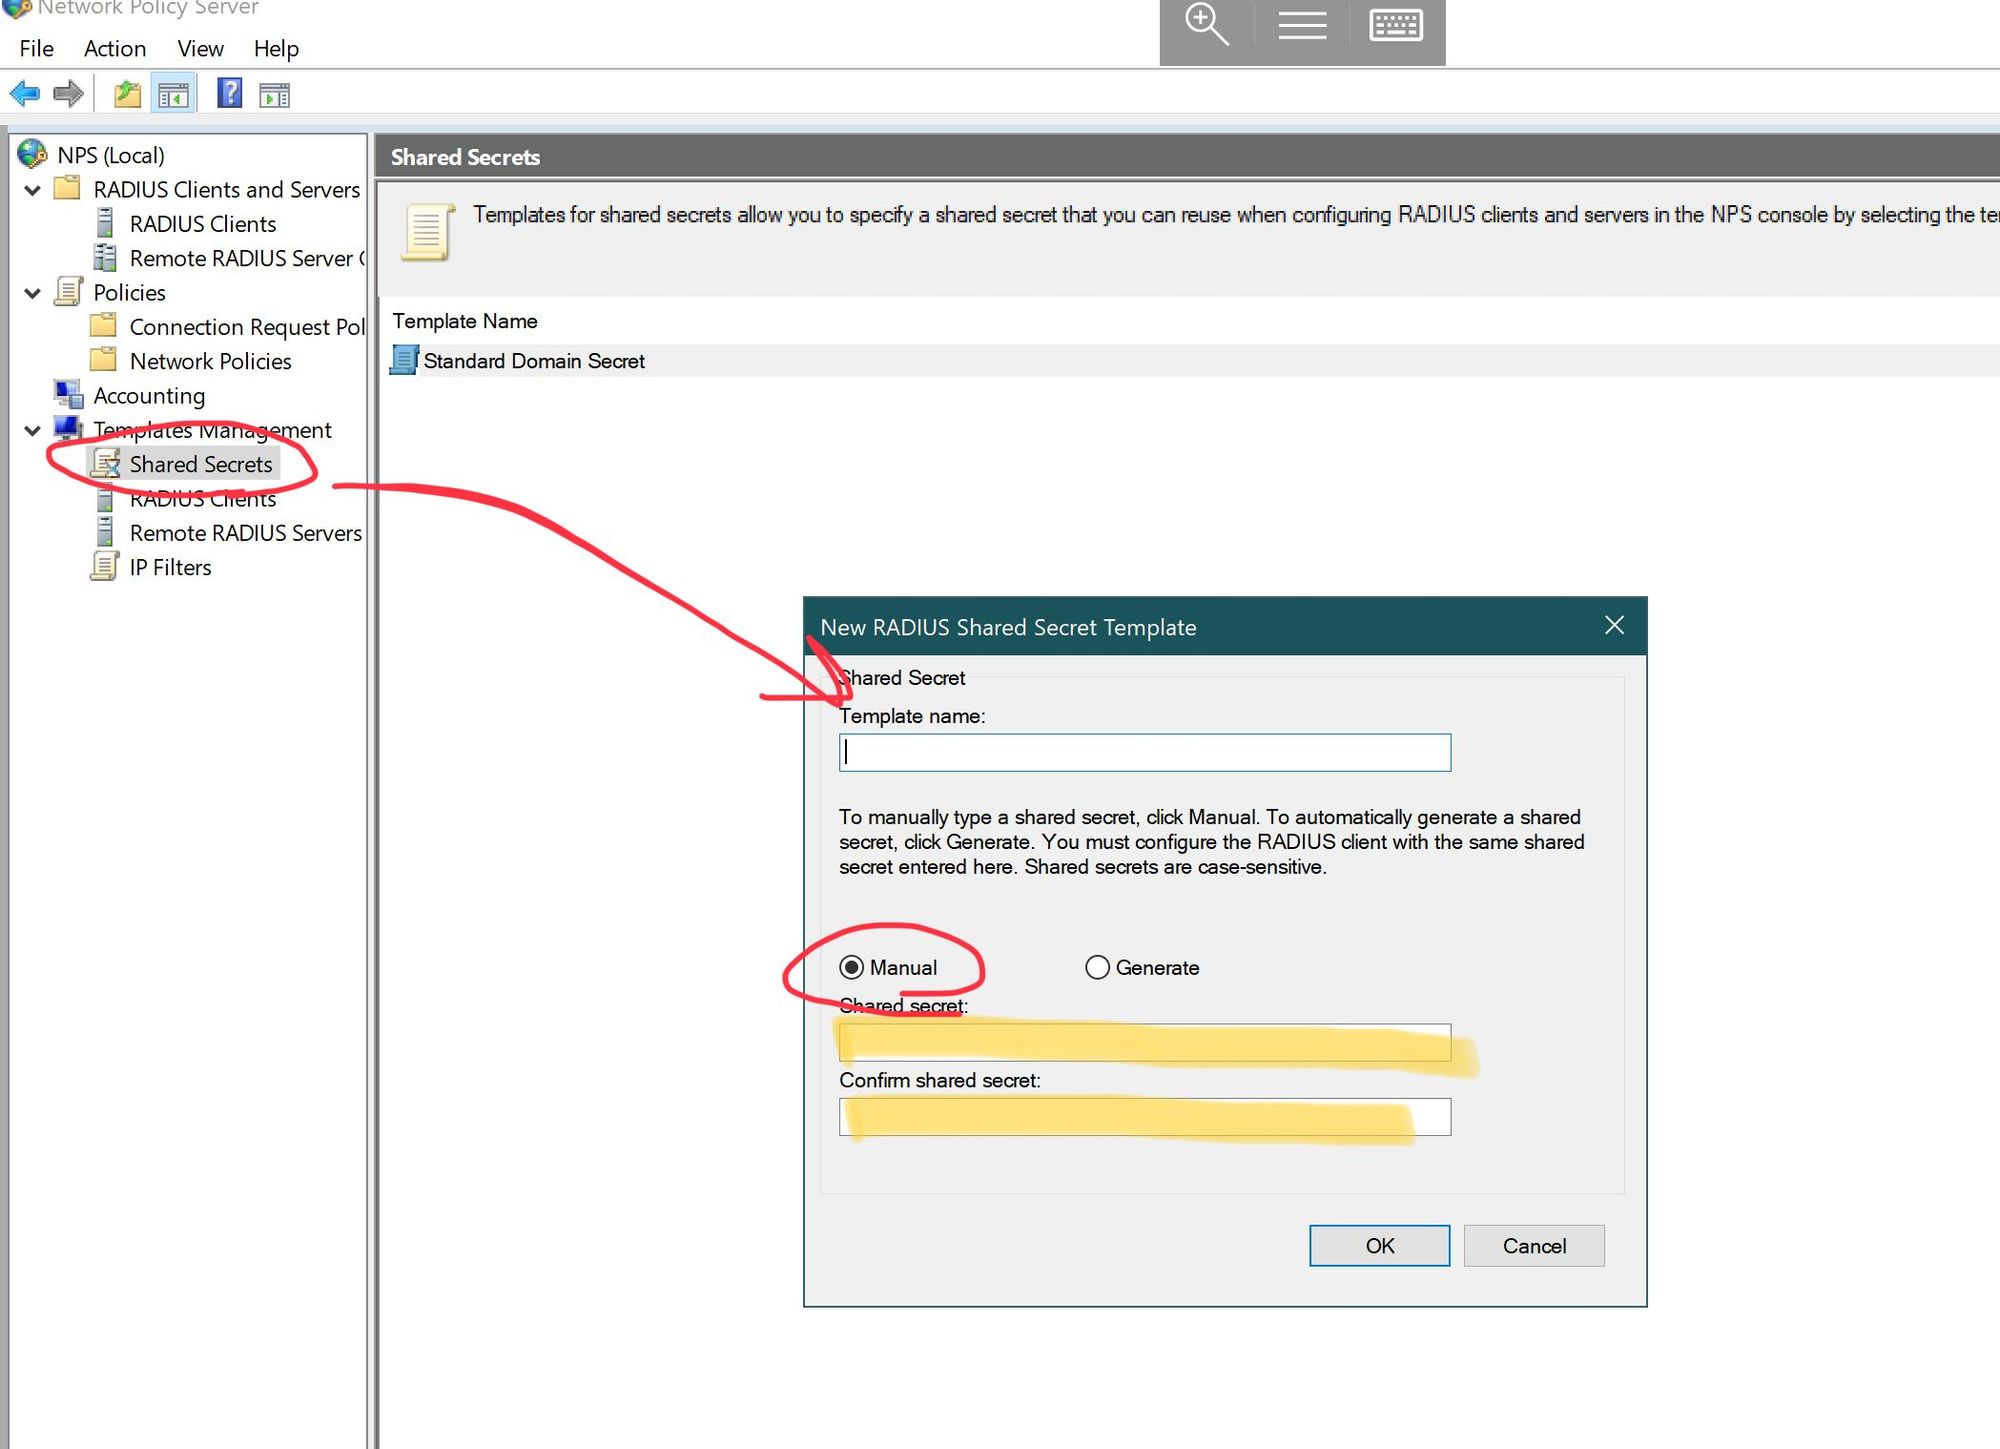
Next you’ll need to configure a couple of templates in NPS: Templates allow you to specify some basic configuration information and then reuse them in policies so you’re not constantly typing everything repeatedly. In NPS, expand the Templates Management section, and create a new Shared Secret template. Type in the Shared Secret from the RADIUS Profile creation page above, and save it.
Next you’ll want to create your RADIUS Clients in Templates Management. A RADIUS Client is defined as the NETWORK POINT that’s accessing the NPS server, and NOT the actual client (e.g. a computer or an IoT device). Understanding this distinction is important as you’ll need to gather the network information about every single wireless access point that will be using your NPS instance. You’ll also need the info for your Cloud Key, as well as your USG. You have to have a USG to configure RADIUS. Here’s a list of what you’ll need to gather before you configure NPS clients:
- The DNS name or IP address of all your Wifi AP’s (I create DNS CNAME entries to alias all my AP’s to facilitate easier lookups)
- DNS/IP for your Cloud Key (I also alias this with a CNAME)
- DNS/IP for your USG (same thing, I create a CNAME for both the LAN and WAN ports)
After you have that information, create a RADIUS client for each one, specifying the Shared Secret template in each client template.
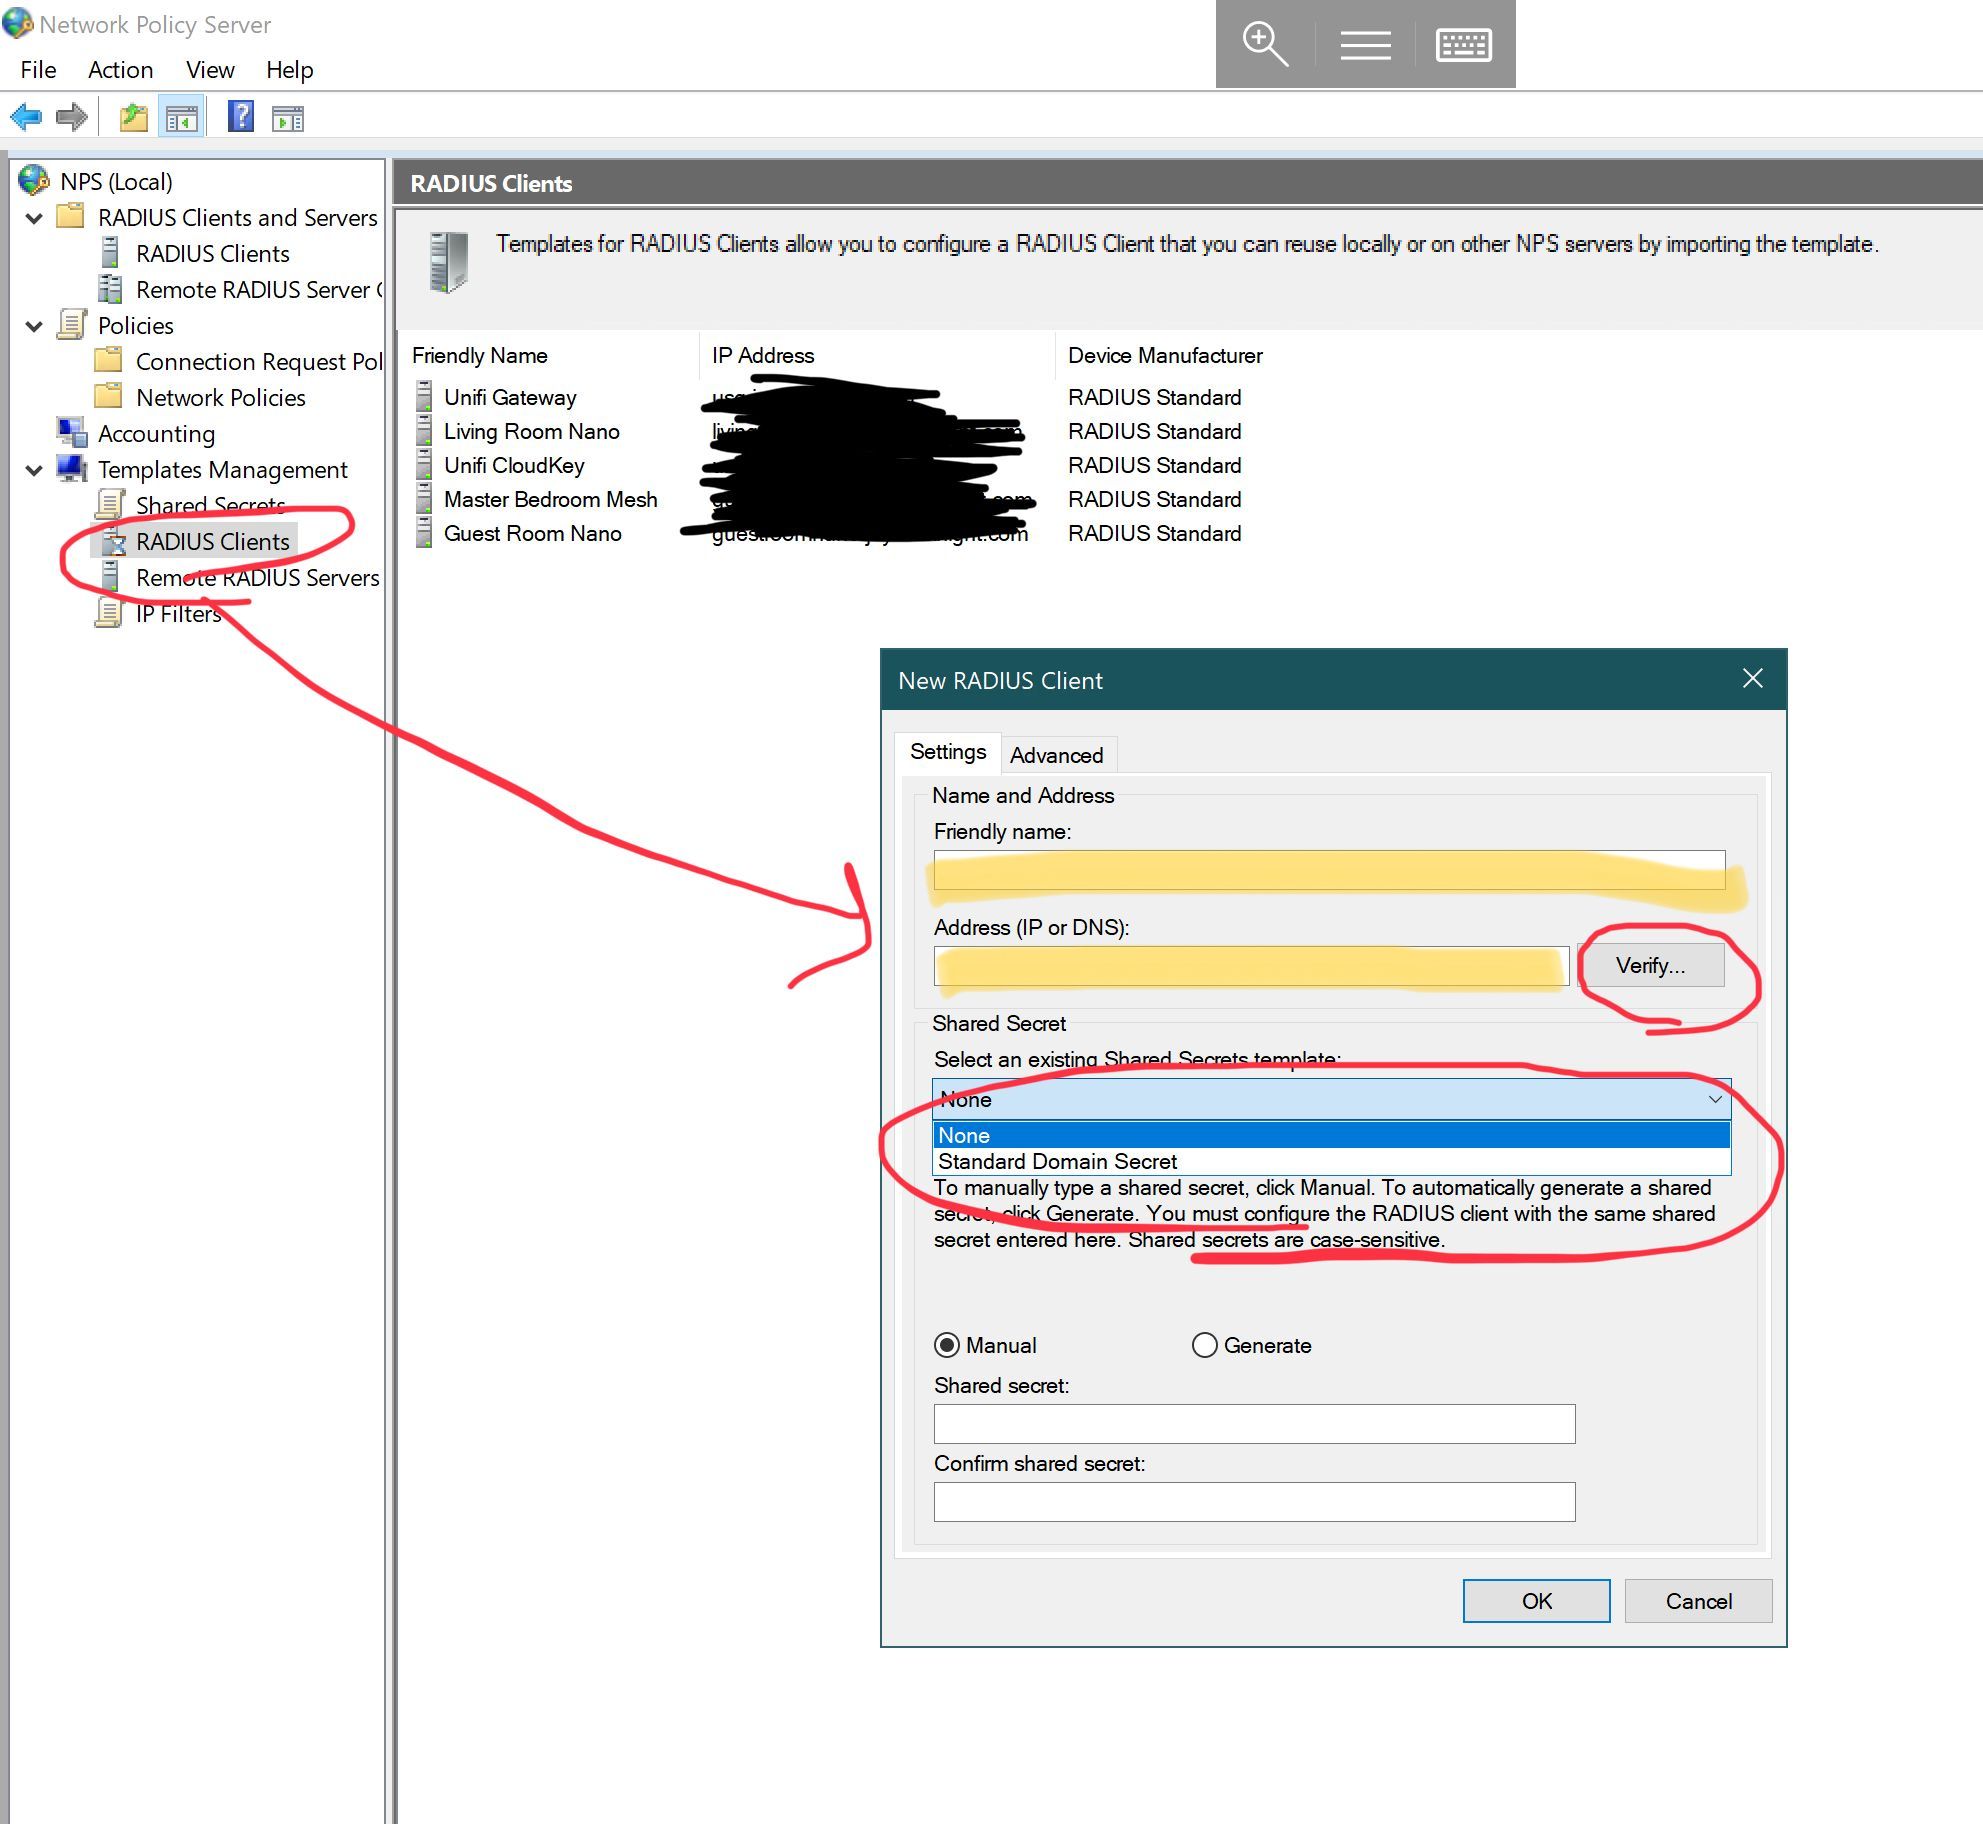
You can create IP filters as well, but that’s beyond the scope of this article. You can see that I have templates for basically all of my network equipment except switches, though you’d need to add switches as well for wired policies. Once you have the client templates created, add them to the RADIUS Clients node in the MMC snap-in by right clicking it, and adding them.
Once your templates are configured, you’ll need to define policies to specify what types of networks are allowed to connect, and what users are allowed to connect. For the sake of this article, we’ll keep it simple.
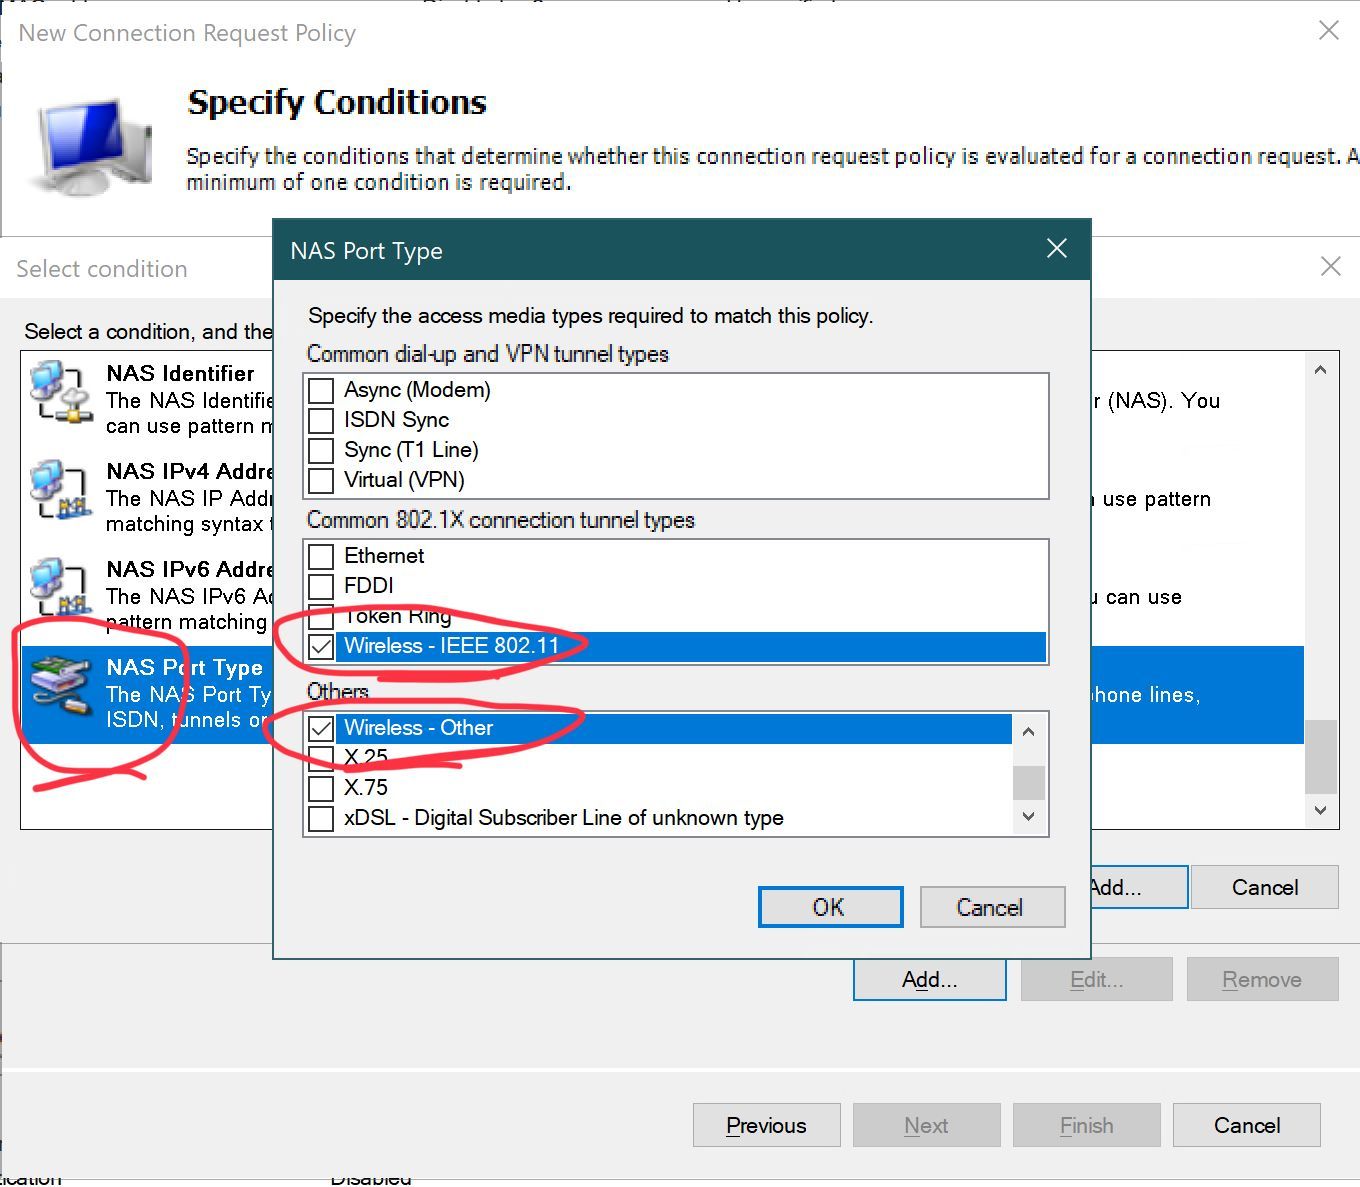
To create a policy that allows wireless requests to use the NPS Server, create a new Connection Request Policy (CP), and in the wizard do the following:
- Give it a name, and leave Network Access Server as unspecified
- Add a connection type of ‘NAS Port Type’ (it’s at the bottom of the list), and select “Wireless – IEEE 802.11” as well as “Wireless – Other’
- Leave the defaults on the next page
- Leave the policy authentication page blank as we’ll define these in the Network Policy
- Leave the Settings page blank (this is where you’d define VLAN settings and other RADIUS attributes if you needed to)
- Click finish
You now have a basic connection policy that allows wireless connections to your NPS instance. Next we need to configure the Network Policy which is where we’ll define the groups that are allowed to authenticate on your wireless network. Right click Network Policies, and start the wizard.
- Give the policy a name, and leave the defaults and click next
- Add a condition, and use ‘Windows Group’ as the choice, and then select the Active Directory group(s) you want to allow to use your wireless network. Click next
- Select either allow or deny (in our case, allow), and leave the checkbox for dial-in properties unchecked. There is a tab in the properties page for AD accounts that specifies dial-in properties, which defaults to “use NPS server”, but you can also control access from that tab in AD
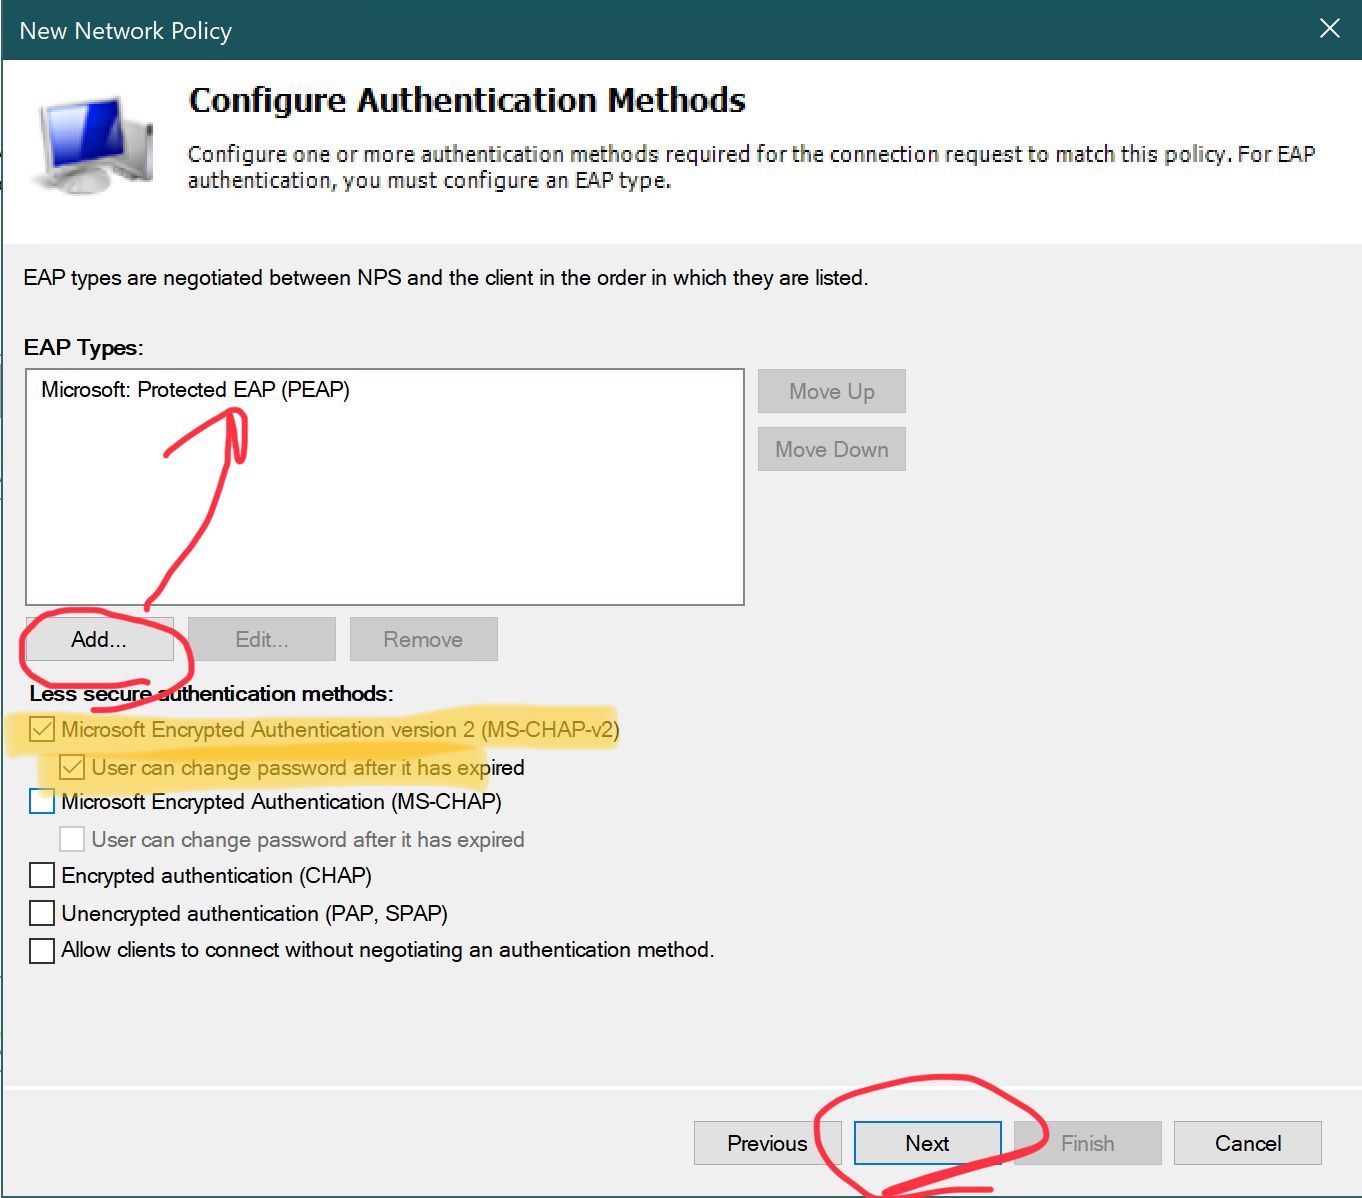
- On the EAP Types page, click add, and select Microsoft: Protected EAP (PEAP). Under “less secure” unselect everything but the top two boxes for MS-CHAPv2.
- Leave the defaults on the Constraints page and click next
- Under Settings, leave the defaults except for Encryption, uncheck EVERYTHING except “Strongest Encryption”
- Click finish
Setting up accounting is very straightforward and can be accomplished by the wizards on the accounting page. If you select Sql Server, it will create the database for you, along with the single table and single stored procedure needed. The columns in the table mirror the layout of the log file for text logging. I’ve created a couple of views that filter the information, and it’s invaluable for troubleshooting connection problems.
If all goes well, you should now have a bare-bones functional Unifi + NPS installation, though you will want to further customize your various policies. It’s worth mentioning that the RADIUS attribute for specifying VLANs for connections is called Tunnel-PVT-Group-ID (from http://wifinigel.blogspot.com/2014/03/microsoft-nps-as-radius-server-for-wifi_18.html). You would use this attribute to assign VLANs to the groups allowed to authenticate to the NPS instance which satisfies the “Dynamically Assign VLANs” selections during the creation of the RADIUS profile in the Controller software.