ESXi no longer supports Realtek Network drivers nor are they included on the installation ISO. However, if you want to install ESXi with the Realtek drivers, then users will have to create a custom ISO. Keep in mind these drivers are NOT supported by VMware and should be used at your own risk. Normally, I would use my trusty ESXi-Customizer GUI program but it is no longer supported for ESXi 6. In replacement they offer a CLI supported program. However, instead of learning another 3rd party tool I’d rather rely on the VMware tools provided to me. VMware enables users to create custom ISOs via PowerCLI and in this blog I’ll explain how I used PowerCLI create my ISO. Keep in mind these are the steps that worked for me and your environment may vary.
— Required Tools and Files —
To get started you will need two files and PowerCLI Installed on a Windows PC. You can skip these steps if you have the ESXi Offline Bundle, PowerCLI installed, and the RealTek Drivers.
STEP1: File 1: Download VMware 6.0U2 Offline Bundle ZIP >> www.vmware.com/download

STEP 2: File 2: Download RealTek 8186 Offline bundle >> https://vibsdepot.v-front.de/wiki/index.php/Net55-r8168

STEP 3: If you haven’t yet download and install PowerCLI >> https://communities.vmware.com/community/vmtn/automationtools/powercli
Tip: If you don’t know PowerCLI try starting here
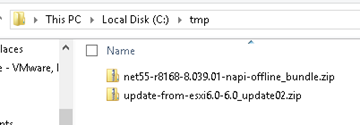
STEP 4: Next Place the files from Step 1 and 2 into c:\tmp folder
–POWERCLI COMMANDS—
Now that you have your files and PowerCLI ready follow these steps. For the steps below I included a screenshot and the actual commands. This will allow you to copy, paste, and edit these commands directly into your environment.
STEP 1: Open PowerCLI (Tip: If you don’t know PowerCLI try starting here)
STEP 2: Add ESXi 6.0u2 and RealTek8186 products to the local Software Depot (Tip: All commands below assume your files are located in the c:\tmp folder)

Add-EsxSoftwareDepot C:\tmp\update-from-esxi6.0-6.0_update02.zip

Add-EsxSoftwareDepot C:\tmp\net55-r8168-8.039.01-napi-offline_bundle.zip
STEP 3: Confirm the products are in the depot

Get-EsxSoftwareDepot
STEP 4: List out the ESXi Image Profiles

Get-EsxImageProfile
STEP 5: Create a Clone Image to be modified – Ensure you are targeting the “ESXi…..standard” profile from step 3

New-EsxImageProfile -cloneprofile ESXi-6.0.0-20160302001-standard -Name “RealTek8186a”
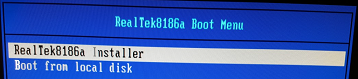
Forward-Looking Tip: Whatever ‘-Name’ you choose, it will show up in your boot ISO
STEP 6: You’ll have 2 entries in this step. First, we’ll Set the Acceptance Level to Community Supported (Remember RealTek is unsupported by VMware, hence “community supported”) and Second, for the ImageProfile you’ll enter the ‘-Name’ you choose in Step 5.

Set-EsxImageProfile -Name RealTek8186a -AcceptanceLevel CommunitySupported
For ImageProfile Enter the ‘-Name’ you choose in Step 5. I entered – RealTek8186a
STEP 7: Ensure the RealTek ‘net55-r8186’ driver is loaded from the local depot (Screenshot shortened)

Get-EsxSoftwarePackage
STEP 8: 3 Entries on this step. First, we add the RealTek software package to the profile. Second, we put in the ImageProfile ‘-Name’ from step 5, and third we enter the SoftwarePackage name.

Add-EsxSoftwarePackage
ImageProfile: RealTek8186a
SoftwarePackage[0]: net55-r8168 8.039.01-napi
Tip: For the SoftwarePackage you MUST enter the full name, if you just use the short name it will not work
STEP 9: Validate the RealTek drivers are now part of the RealTek8186a Profile (Screenshot shortened)

(Get-EsxImageProfile “RealTek8186a”).viblist
STEP 10: Export the profile to an ISO

Export-EsxImageProfile -ImageProfile “RealTek8186a” -ExportToIso -FilePath c:\tmp\RealTek8186a.iso
And that’s it… You should find your new ISO in the c:\tmp folder. From here you can burn your ISO to a media of your choice or boot the ISO via ilo, iDRAC, virtual media etc.
If you like my ‘no-nonsense’ blog articles that get straight to the point… then post a comment or let me know… Else, I’ll start writing boring blog content.